Five Minute Mini Bouquets

One of my favorite things about growing flowers is gifting them to neighbors and loved ones. Within the cutting garden, I've chosen each bloom's variety and color and grown them lovingly from seed, so it is a small part of my heart I share with each bouquet.

These mini bouquets are a perfect way to show appreciation or simply spread the joy of flowers to the homes of those you care about. They make great teacher's gifts, housewarming gifts, or "just because" surprises. Here's a quick tutorial.

You Will Need

  • Fresh cut blooms 
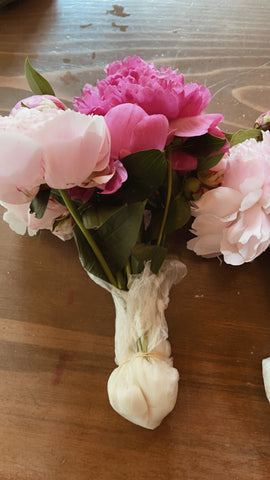
  • One square piece of food plastic wrap (saran wrap) approx 12"x12"
  • A few layers of sopping wet paper towel or newspaper
  • six sheets of tissue paper approx 12"x12"
  • one sheet of brown kraft paper approx 12"x12"
  • Pruners 
  • 2 rubber bands
  • Twine or ribbon of choice

Find all my favorite floral arranging supplies and tools HERE.

If you are drawn to the language of flowers, a complete glossary of flowers, herbs and other botanicals and their meanings can be found in a book I co-author with Lisa McGuiness, called The Love Language of Flowers. It also includes step-by-step tutorials, a toolbox section filled with floral concepts, and over 30 botanical designs with meaning that honor the seasonal rhythms of nature, build confidence, and provide flexibility to let your own creative voice develop.  It is truly an excellent resource for those seeking to grow their botanical creativity in a meaningful way. 

flowers, flower bouquet tutorial, bouquet tutorial, flower tutorial, fresh cut flowers, fresh cut, blooms
STEP 1
Gather your blooms, pull off all greenery and secondary stems from the bottom half and cut them to the same length. 
peonies, peony bouquet, bouquet tutorial
STEP 2
Place your wet paper towel inside the plastic wrap and wrap it around the ends of your bouquet stems. Secure with a rubber band.
peonies, peony bouquet, bouquet tutorial
STEP 3
Place a small stack (about three pieces) of tissue paper on the table and then three more, slightly turned as shown below. Then place your bouquet on the paper so that about half of the blooms are above the paper. Wrap and hold.
                   peonies, peony bouquet, bouquet tutorial, flower bouquet
STEP 4
Place the kraft paper down and do the same thing, making sure a little more than half the flowers are poking up above the top of the paper. Wrap around the stem base and secure with a rubber band.
bouquet tutorial
STEP 5
Add a pretty ribbon or twine and prepare to make someone's day. 
mini flower bouquet, bouquet, flowers
Disclaimer: This article may contain affiliate links. Cedar House Living LLC receives a small commission for sales generated through these links at no additional cost to you. I use the commissions to further expand my garden, floral, and herbal knowledge so I can continue to share what I learn with you.

Leave a comment

Please note, comments must be approved before they are published